2015-10-31

Etsy Love


I adore Etsy. I think the idea of Etsy is brilliant and I love the many incredible things you can find there.

In this post I wanted to share with you two of my favourite Etsy shops. These are not my only favourites, but just two of the shops that I love. I have previously mentioned two other Etsy shops that I adore, Frostbeard Studios (mentioned here) and Sara R Rocha's shop (mentioned here). Today I'll share with you one shop that belongs to an amazingly talented illustrator and another shop that belongs to a very skilled crafter.

The first shop is the illustrator Morgane Carlier's Etsy shop, that you can find here. The new banner to my blog is made by Morgane and I got it through Etsy, and I could not be happier with it. It captures me in one image and in my mind it is perfect!

Morgane's art is quirky, happy and girly! Just the things that I like! She's got a unique style that brightens the surroundings! Apart from the beautiful blog banner, I have also got a Mary Poppins print in my home from Morgane and a tote bag with the most yummy-looking sweets illustrated on it.

Morgane is a total professional. She is sweet and works efficiently and quickly. I have only ever been way beyond happy when I have purchased from Morgane. And I have even developed a relationship with the exquisite Morgane, and I can now call her one of my darling friends. You can find Morgane's shop right here. Morgane's website is here and Morgane's instagram is @morganeca.


The second shop I want to introduce you to is The Mad Girl Shop belonging to the lovely Madison Steward. Everything from delicate cross stitching to brooches and scarves can be found in The Mad Girl Shop. Madison is such an expert knitter, and makes the most beautiful scarves and ascots, one of which I had to get as it has wonderful leaves knitted in it and it is in my favourite colour, mustard yellow. It is the most perfect autumn ascot, I want one in every colour.

The ascot is incredibly well-made and I am astonished by the handiwork that has gone into it. The beautiful dainty leaves are astounding, and it's warm and comfy too. I also have my eyes on these incredible Hogwarts scarves that Madison knits, that look so nice and pretty. The HP fan within me has a beating heart for anything to do with her house and Madison's Ravenclaw scarf is flawless. You can find Madison's shop, The Mad Girl Shop, right here and her instagram is @madisonsteward.

Dress: River Island (old, similar from Mod Dolly here)


Have a lovely Halloween weekend!
Much love.

2015-10-27

Icing without the cake


Last year I made a pumpkin pie for the very first time (see it here on the blog), and while I was extremely happy with how it turned out because of the "crust work" that I did on that pie I did find the pie filling to be the tastiest part. Let's be real, a pie's filling is why we eat pie. The filling is what makes the pie and it's usually the most delicious bit of the pie. The crust is just the casing. So I had the idea of making pumpkin pie without the crust, sort of like having the icing on a cake without the cake.


I made a pumpkin pie filling and then poured the batter in cupcake cups in a cupcake tin. It was quite the experiment and I had no idea if it would work or the batter would hold once baked. But to my surprise it turned out quite well. It is possibly one of the easiest bakes I've ever made, you'll see below in the recipe how simple it actually is. All in all I conclude it as a successful experiment.


Pumpkin Pie Cupcakes


INGREDIENTS
  • 425 grams (one tin) pumpkin purée
  • 397 grams (one tin) of sweetened condensed milk
  • 2 eggs
  • 1 teaspoon ground cinnamon
  • 1 teaspoon ground ginger
  • 1 teaspoon ground nutmeg
  • 90 grams flour
  • 1/4 teaspoon baking powder
  • 1/4 teaspoon baking soda
  • 1/4 teaspoon salt


DIRECTIONS

Heat oven to 175°C. 
Mix everything together in a bowl. Pour batter into cupcake cups in a cupcake tin (to hold their shape). Bake for about 20 minutes.
Leave to cool completely and refrigerate for at least 30 minutes before serving. Serve with whipped cream and some sprinkled cinnamon on top.


Much love!

2015-10-25

Understanding Cancer - The Cancer Series part 6


It was a while ago the Cancer Series made an appearance, so let me refresh your minds. In the latest part of the Cancer Series (part 5) we learned about oncogenes and tumour suppressor genes. As you recall, oncogenes are like the gas is stuck on a car. Mutations in oncogenes changes the appearance of the protein the gene codes for so drastically that the protein that is supposed to turn it off cannot recognise it anymore. So the oncogene is stuck on "On" and tells the cell to grow and grow and grow... Tumour suppressor genes are like the brake of a car. They tell cells to stop growing. However mutations in tumour suppressor genes is like losing the brakes of the car, so suddenly there is nothing that can stop the cell.

There are many different types of treatments against cancer though. There is no real cure, because as you remember in part 3 we discussed how all cancers are unique. However there are different methods, with varying preciseness that exist against cancer. I thought we'd talk about the treatments that are used in this part.

The most obvious way to treat a cancer is to cut the tumour out of the body, which is called resection. Resection is not always possible, the tumour might be growing in a way where it is impossible to cut it out. And even when it is possible to resect the tumour, it is difficult to know if every single cancer cell has been resected, and cancers can grow back.

The next step of treatments are chemotherapy and radiation. Starting with chemotherapy; it's different types of drugs that is injected into the bloodstream and therefore affect the whole body. It's a very blunt and unprecise method. Chemotherapies affect all cells in the body that are growing rapidly. Which means that cancer cells are targeted, but also normal healthy cells that grow rapidly, for example hair cells, and cells inside the gut. This is the reason for the many horrible side-effects of chemotherapy, with e.g. digestive/intestinal symptoms and hair loss.

Radiation is also one method of treatment that is quite blunt. The radiation used for cancer therapy is ionising radiation. The way it works is that it tears DNA to pieces. The DNA in the cancer cells gets so mangled up that the cancer cell can no longer make copies of the DNA, which means it can no longer grow or divide, so it dies. However radiation does not target just cancer cells, but all cells it "touches". The radiation is of course aimed right at the tumour, but nearby healthy cells will be affected.

This time we discussed the methods of treatments that are available against cancer. We discussed how they are all quite blunt and unprecise methods. In the next part I will tell you about the new generation of treatments that are just starting to be used, and that has/will revolutionise cancer treatment!

On to the outfit...


This dress makes me smile because it's got all the things I love in a dress. It's got long, lovely sleeves, a cute little collar, beautiful pleats and the cutest polka dots! Also, it's pink, so you've got to love that too. And it's a nice mellow shade of pink, so I don't feel too "Barbie" wearing it, even thought it's terribly cute in every other way.


Dress: ModCloth (old)
Tights: Primark

Hope you have all had a lovely weekend!
Much love

2015-10-24

Smart Wizard


Here she is, the Ravenclaw in her natural habitat.

Lately I've been having Harry Potter on my mind. A lot.
I think it's to do with Harry Potter and J.K. Rowling being in the news a lot recently. If you haven't heard (which I'm sure you have) the next instalment of the Harry Potter series is coming, as a play instead of a book. It's called Harry Potter and the Cursed Child, and you can read all about it here. Yesterday they announced that the tickets will soon be going on sale, and I am so excited about this that I had trouble falling asleep last night. I have been waiting for another piece of the world I love so very much for years, and to finally get it in the form of theatre is incredible!

Since I've gone so far into the world of Harry Potter lately I thought I'd tell you about these amazing scented candles I've found on etsy. They're from a shop called Frostbeard Studio which make all their own unique candles by hand. They've got what they call the Book Lovers' Soy Candles, with scents like Old Books, Oxford Library, and Gatsby's Mansion. They've also got a range of Harry Potter inspired candles, including my favourites: Smart Wizards, in Ravenclaw's distinct blue colour, and Wizardy Buttery Drink, that smells just as Butterbeer tastes.


I hope you all have a splendid Saturday!
Much love

2015-10-20

Into the Woods


When I was younger we would go into the woods with school quite often. There were so many activities that would take place in the woods. We would pick berries and mushrooms, go on small adventures and collect pine cones and pretty leaves. But then I grew up and became a busy gal. And since I was in school I haven't been to any woods until recently when I took these photos. The child in me came out again, and I wandered around joyfully. I realised that I really missed being around nature, smelling the scent of the trees and wet ground beneath me. There will definitely be more occasions on which I invite the child in me to go have an adventure in the woods again.


Dress: Miss Patina (here)
Tights: Asos (here)
Shoes: Ecco (old)


Much love!

2015-10-17

Ten thousand!


This Saturday there will be a short break from the Cancer Series, and instead there will be a celebration post!

I hit 10,000 views on my blog yesterday!!

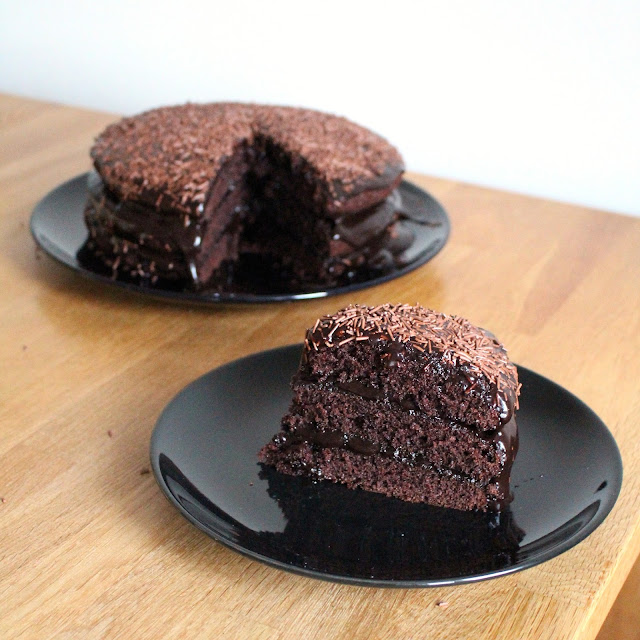
To properly celebrate these fantastic news I made the most chocolatey and delicious cake (you'll find the recipe lower in this post) and stuffed my face with it!

I want to thank everyone who reads this blog! Thank you for taking the time and reading what I have to say, it means the world to me! In just 6 months this blog has become a place that I am proud of and so happy I have created. I have established friendships through this blog with lovely people all around the world, and I am so happy and grateful for that. The people who interact with me through this blog, and comment and talk to me - you are all golden! And so is the person who reads the blog silently, I'm so happy you've decided to stay a while in my space and heed my words.

A big Thank You to all of you out there!!

Now, on to the recipe...


This cake is a little experiment. The sponge is one of the best recipes I've ever tried for a chocolatey sponge, and it is from The Hummingbird Bakery Cookbook. The sponge is the one used for the Brooklyn Blackout Cake, and it is meltingly perfect in the mouth. 

I added a trusty ganache between the layers and on top of the cake, and sprinkled some chocolate sugar strands on top. And it really turned out into a lovely rich and decadent cake. 

Luxurious Chocolate Cake


Sponge

Recipe adapted from The Hummingbird Bakery Cookbook by Tarek Malouf

INGREDIENTS
  • 100 grams butter, room temperature
  • 260 grams sugar
  • 2 eggs
  • 1 teaspoon vanilla sugar
  • 45 grams cocoa powder
  • 3/4 teaspoon baking powder
  • 3/4 teaspoon baking soda
  • 170 grams flour
  • 160 ml milk

DIRECTIONS

Preheat oven to 170°C.
Mix the butter and sugar until light and fluffy. Add the eggs one at a time mixing well after each addition. Beat in the vanilla, cocoa powder, baking powder and baking soda. Lastly add half the flour, all the milk and then the last half of flour.
Pour the batter into three 20 cm tins and bake for about 25 minutes.

Let cool to room temperature before you continue.

Chocolate Ganache

INGREDIENTS
  • 200 grams chocolate, chopped
  • 2 dl heavy cream
  • 1 tablespoon butter

DIRECTIONS

Heat the heavy cream and butter until just before a boil. Remove from heat and pour over the chopped chocolate, mix until combined.


ASSEMBLY

Place one of the layers on your serving plate. Spread 1/4 of the ganache on the layer, then place the next layer of cake and continue with spreading another 1/4 of the ganache on it. Continue until all three layers are in place. On top of the whole cake pour the remaining 1/4 of the chocolate ganache and let it pour down the sides of the cake.
Decorate with chocolate sugar strands if you wish.


Thanks again and Much love!

2015-10-15

Donut worry


This doughnut dress is one of my favourite dresses of all time (most probably because it's got embroidered doughnuts on it! Doughnuts!). I first saw this dress on my Instagram/blogger bestie, the intelligent, lovely and stylish lady, Liana of Finding Femme. Liana's blog is one of my big blog-inspirations, her posts are elegant and eloquent, and her style is always beautiful. When Liana wore this dress she styled it impeccably with a beautiful belt and scarf, and fantastic heels. As we are going towards colder weather here in Sweden, I styled it with a pair of thick tights and warm cardigan (that I didn't wear for the pictures, because the dress looked better without). We are already reaching temperatures below zero during night and early mornings. So tights were an essential.


I've proclaimed my love for doughnuts on the blog before. As I said then, good doughnuts are hard to come by in northern Sweden. We don't have the immensely famous Krispy Kreme or Dunkin' Donuts, so from time to time I embark on the adventure of whipping up my own doughnuts.


So far I have only ever tried making "Cake Doughnuts" and if I am to be honest I didn't know that there were different types of doughnuts until quite recently. With the info I've gathered Cake doughnuts are more old-fashioned and are raised by baking powder rather than yeast and therefore have a more "cakey" texture. All I know is that they are delicious and easy enough to make.

The recipe I use can be found here from Joy of Baking. I've mentioned Joy of Baking earlier and I cannot rave about it enough, what a brilliant place it is! I often use recipes from Joy of Baking so don't be surprised if you see it again on the blog.


CAKE DOUGHNUTS

Recipe adapted from Joy of Baking.

INGREDIENTS

  • 2 eggs
  • 165 grams sugar
  • 1 1/2 teaspoon vanilla extract
  • 390 grams flour
  • 3 teaspoons baking powder
  • 1/2 teaspoon salt (I used regular salt)
  • 3/4 teaspoon powdered nutmeg
  • 40 grams butter, melted
  • 120 ml milk, room temperature

DIRECTIONS

Whisk together flour, baking powder, salt and nutmeg in a bowl.
In another bowl, beat eggs and sugar until light and fluffy. Add the vanilla. Alternately add the flour, milk and melted butter. The batter will be soft but cover it with plastic film and let it sit at room temperature for half an hour.

When the batter is firm enough to roll out, do so on a floured surface with a floured rolling pin to about the thickness of half a centimetre. Cut out with doughnut cutter or cookie cutters. I used two cookie cutters, one 8 cm one and another 2 cm one for the doughnut hole. Heat up oil in a fryer to 190 degrees C. I used canola oil, but you can use any oil you prefer. Carefully place two doughnuts at a time in the fryer and fry each side for about 60 seconds or until golden brown. Remove doughnuts from fryer and let sit on paper towel until cooled.

The doughnut is ready for icing, sugar or ganache. Or you can eat them as they are, they're delicious as they are without anything on too.


Homemade doughnuts are really great, and they are fantastic straight out of the fryer. So delicious when they're still a bit warm. I love to fry the doughnut holes on their own and roll them in cinnamon-sugar and eat them before I eat the actual doughnuts, but don't tell anyone... 


Dress: Nishe via Asos (old)
Nail polish: Barry M - Gelly Hi Shine in Blueberry


Much love!